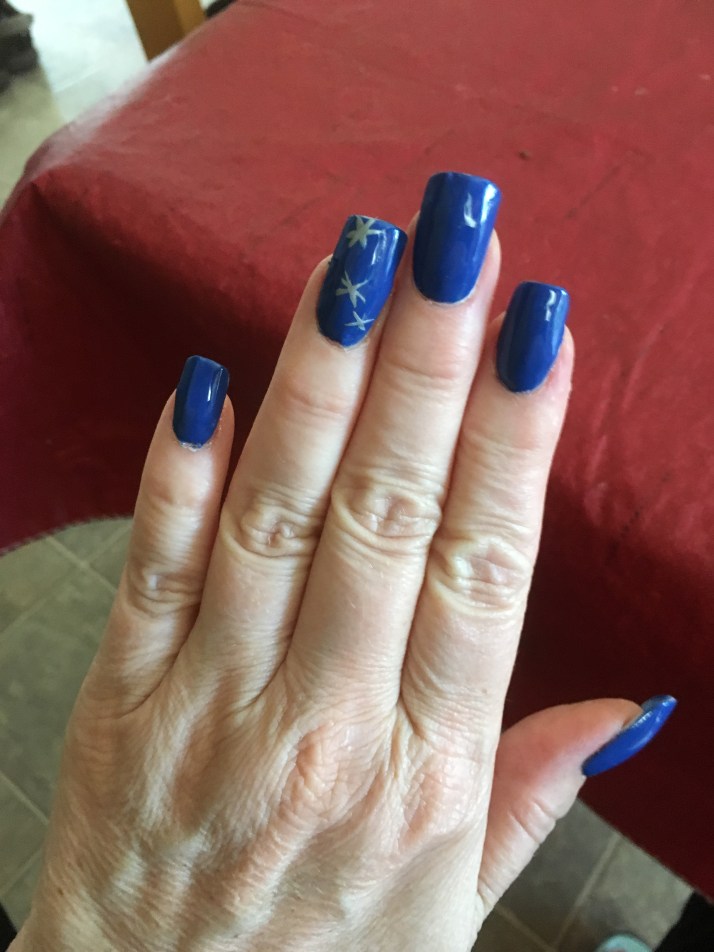
Happy Memorial Day! I wanted to do something patriotic for the holiday, so I decided to try my hand at doing my own acrylic nails. I know this has nothing to do with the holiday, except the nail art and color I used. My own nails are brittle and take forever to grow. Plus I have man hands, and need longer nails to not look like said man. I looked at some stick on nails, but they were too short and too small. I thought about going to one of the many nail salons in town to get a full set done, and decided that I’m too cheap, and I bet I could do them myself.
So after reviewing Pinterest and YouTube, I decided what the heck, I can do this. So off to Sally Beauty I went. Salons in my area charge anywhere from $35 to $70 for a full set. I paid less than $45 for the complete nail kit, nail form kit and better brush.
First off I have to give the staff at Sally Beauty props. Whenever I have shopped there the staff is beyond helpful and very knowledgeable. I’ve never done acrylic nails before, so I had a lot of questions. Plus I have a short attention span and didn’t want anything to difficult or too expensive. I have a tendency to buy beauty products, then they end up under my bathroom sink, then given to my 20 year old niece six months later.
Let’s get started. I purchased this kit Beauty Secrets 4 in 1 Extension Kit. Buy here. for $17.59 with my Sally club card. It had everything I needed. I also purchased these Form a Nail Nail Forms Form a Nail Nail Forms. for $7.79. This is the product which really sold me on doing the nails myself. It is super easy to use. The nail forms are reusable and make for a smooth finish.


I prepped my nails, and off I went. I have to say the brush that came with kit was really crummy. Given how crummy it was, I was surprised at my end result. I bought another brush that worked way better for $9.29 at Sally. Beauty Science #8 Pro Sculpt Brush . Again the staff at Sally was so helpful. One of my nails had popped off, so I needed to do a repair. Using the Nail Forms makes it a breeze. I also purchased Terrific Tips Nail tip cutters for $6.49 at Sally Beauty. Nail tip cutters


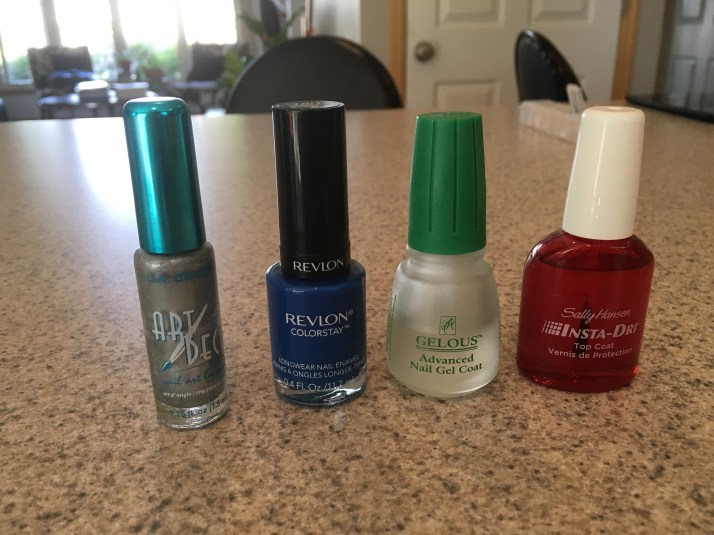
After I put the tips on and filed them I used this Gelous Advanced Gel coat to smooth things out. Gelous Advanced Gel Coat at Sally Beauty. I use this all the time when doing a regular manicure, and it makes my nails look like I’ve had a gel manicure. Next I used Revlon Colorstay Longwear Nail enamel in Indigo Night. Nail color Here it is on Amazon. I bought mine at Dollar Tree for $1. I also used L.A. Colors Art Deco in Silver L.A. Colors Art Deco in Silver another Dollar Tree find at $1. To finish things off I used my go to favorite top coat, Sally Hansen Insta Dry Top coat Best top coat ever! I’ve been using this top coat for years. I have not found any top coat that works better. It’s $5.99 at Ulta. This stuff is so good that I can paint my nails before I go to bed, and they end up perfect the next day.
One last note, after the one nail popped off, I put nail glue in the crack between my natural nail and the tip on the back of my nail. They feel much more secure now.
I hope you enjoyed my first DIY nail post. Thanks for stopping by.

